How to Turn Your Bike into a Medieval Torture Device – in One Easy Step!

February 13, 2010

Wow, this is way too much like work!!!!

Winter is a rough season for cyclists.  We want to keep riding to stay in shape, but the weather rarely cooperates.  I ride outdoors in winter, but it’s an iffy proposition.  Riding a road bike in the snow is NOT recommended, so one must wait for the snowplow to do its job, then pray for sufficient sun to melt off the road surface before venturing out.  “Sun”, by the way, is a term not recognized by native Clevelanders.  I only know the meaning of the word because I was born far south of here.  As a result of all this, the average cyclist can’t do much outdoor riding in the winter.  Oh, and did I mention that winter starts right after Halloween and ends somewhere around Memorial Day?  Yeah, and spring is a theoretical season that is said to occur during that twenty-four hour period between winter and summer, at which point the temperature and humidity both shoot up to the high 80’s and everyone heads for the beach, only to find that the lake is still frozen.  But I digress….

A couple of years ago, I purchased a bicycle trainer in the hope of keeping in shape over the winter.  This year I set it up in the living room and I’m trying to force myself to use it at least five days a week.   For those of you who don’t have or haven’t seen one of these things, it’s definitely not like riding a bike outdoors.  The trainer is a stand in which you clamp the rear axle of your road bike.  The front wheel sits in a stationary cradle.  The rear wheel drives a roller, which is attached to a resistance unit, which uses either a torque converter of sorts or a pair of magnetic discs to provide adjustable drag on the wheel.  My trainer is a fluid model, which uses a torque converter thingy attached to a five-position shift lever mounted on the handlebars.  You can use both the fluid shift and the gears on your bike to change the amount of work required to pedal the bike.  So there’s a wide range of adjustment possible, but it’s still not easy.  You can’t coast, you must move the pedals continuously.  And, unless you set an electric fan in front of the bike, there’s no airflow, so you sweat at an incredible rate.  Nashbar, Performance, and some other companies sell a sort of “bra” to catch the sweat and keep your bike’s frame from corroding, but  I think the fan is probably the best solution, especially for the comfort factor.   Most cyclists don’t realize how much cooling effect they get from the forward movement of the bike, but a half hour of pedaling in dead air will make you realize how much sweat you’re generating over the course of your ride.

I started on the trainer, as I do most years, shortly after the holidays.  At this point in the year I’m usually about ten pounds heavier than my “normal” weight.  This year it’s closer to twenty; I’ve been spending a lot more time at home,  cooking a lot more than usual, and just plain enjoying myself way too much.  I had to start out wearing my “fat” shorts, pair of Canari padded cycling shorts that won’t even stay up when I’m in shape.   They fit great right now!

Sally’s decided she wants to get ready for riding season as well, so we’ll be swapping bikes on the trainer and taking turns from here on in.  Misery loves company!

Product information and tips:  I use a Travel Trac Century V Fluid+ Trainer with a CycleOps Climbing Block to cradle the front wheel.  Both products are excellent and highly recommended.  A fluid trainer is definitely superior to a magnetic one – smoother, quieter, and more easily adjusted.  And the CycleOps block gives you three height options, plus you can stack multiple blocks to simulate steeper climbs if you wish.  Be sure to put a mat down to cover and protect your floor covering – I use a six-foot length of vehicle carpeting, available in the automotive section of many big box stores for cheap.  When setting up the trainer, you’ll probably need to readjust your saddle height and position.  Make sure the saddle is fairly level, and adjust the front wheel height as needed to balance your weight distribution.  Too much weight on the hands can be really uncomfortable when training indoors (especially when you’re out of shape in the first place).  Don’t forget to wear your cycling socks, gloves, shorts and shoes – the same one’s you would wear on a fitness ride.  Otherwise, you’ll get blisters for sure.  I find that I get a really good, sweaty workout in about 30 minutes.  Good luck with your training!


Bounding through Brown & Adams County in Search of History

September 23, 2009

A couple of weekends ago, Sally, Andy and I visited my mother in Brown County.  We decided to take a jaunt around the area to visit a few of our favorite places, and hopefully, to find a few new points of interest. 

This crypt occupies the summit of the hill, shaded by a large tree

This crypt occupies the summit of the hill, shaded by a large tree

Brown & Adams Cty Sept 3, 2009 009

Georgetown:  A Beautiful Tomb

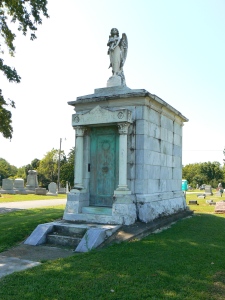
Our first stop was the Georgetown Cemetery, where we encountered this very interesting and elaborate crypt in a prominent location.  The marble statue at the apex of the roof is still beautiful in spite of (or perhaps because of ) the patina she has acquired over the last 90 years. 

Two women are interred here; their relationship to one another is not evident.  Clearly, the older of the two women purchased the tomb, as it is her name that adorns the lintel over the door.   The names of the occupants and their dates of birth and death are inscribed on tablets beside the steps up to the door.  Who were they?  If you know about Mary Shelton or Mary Cochran, please post a comment and enlighten us.

Mary Shelton

Mary Shelton


Mary Cochran

Mary Cochran

Incidentally,  if you visit Georgetown, you should visit U.S. Grant’s boyhood home and the school he attended as a young man, both of which are open to the public. 


Ripley, Ohio - destination of many fugitive slaves before and during the Civil War

Ripley, Ohio - destination of many fugitive slaves before and during the Civil War

Ripley: Home of Abolitionism in Ohio


After a hearty lunch at the Fireside Restaurant in Georgetown (highly recommended!) we headed down the road to Ripley, Ohio.  Ripley was a very important town in the days prior to and during the Civil War; it was a hotbed of  abolitionist activity, a major stop on the Underground Railroad, and the home of  Rev. John Rankin.  Rev. Rankin and his sons were conductors on the Underground Railroad, providing safe conduct to numerous fugitive slaves on their way to Canada and freedom.   Harriet Beecher Stowe was highly influenced by Rankin’s anti-slavery activities.  Sights not to be missed in Ripley include the Rankin House (check it out at http://ohsweb.ohiohistory.org/places/sw14/index.shtml),  the monument to the first abolitionists in Ohio, and Freedom Landing (right below the monument). 

Witness Tree seen from the riverbank

Witness Tree seen from the riverbankWitness Tree tablet

Freedom Landing

Freedom Landing


Commemorative tablet at Freedom Landing

Commemorative tablet at Freedom Landing

The trip to Ripley is well worth the drive – while you’re there, stop at Rockin’ Robin’s for ice cream – it’s a 50’s style soda fountain with great atmosphere.  Word of warning:  the “single dip” ice cream cone is a LOT larger than you’d think!

Adams County Heritage Center and a Brush with My Ancestors

 I have long known that my maternal grandfather’s ancestors were the first settlers of Adams County, Ohio.  Two  Ellison brothers made the journey down the Ohio River in 1790 along with seventeen other men and their families, all of whom had been offered property in return for settling at Massie’s Station, later called Manchester, Ohio.  Manchester was the first white settlement in the Virginia Military District.     Col. Daniel Collier, listed among the field officers of the 2nd Brigade, Ohio Militia in the War of 1812, was an early settler and leader of the community.  His son-in-law, Andrew Ellison was my great-great-great-great-grandfather (assuming that I’ve correctly calculated the number of greats, that is).   Andrew’s family owned a two-story log house on the ridge road (later called Vaughn’s Chapel Road) in Adam’s County built around 1803.  Why did I tell that story?  Well, for two reasons: first off, as a child, I played in that house, which was still standing on the original site right up until the late 1980’s, when it was sold, disassembled, moved to Loveland, Ohio and reassembled (or so I’m told – please contact me if you have info on this matter).   My Aunt Hattie Osman lived there with a flock of turkeys, ducks, geese, and a few score of cats until her death.  On the hill behind the house was the Ellison family cemetery where Andrew and many others are buried.

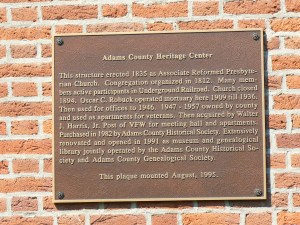
Plaque on the Heritage Center Building

Plaque on the Heritage Center Building

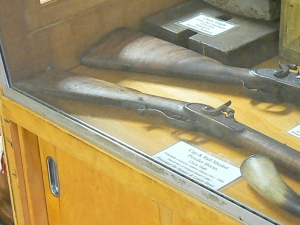
The second reason for this rambling account is that I recently paid a visit to the Adams County Heritage Center in West Union, Ohio to get a close look at great(x4)-grandpa Andrew’s rifle.  It’s in a glass case, incorrectly labeled as a cap & ball “musket”.  What it is, in fact, is an Ohio made half-stock hunting rifle (muskets are military firearms) of about .45 caliber with a beautiful curly maple stock and handmade iron furniture.  It is a cap and ball firearm, and that fact is troublesome.  You see, for Daniel Collier to have owned the rifle originally, it would have to have been built before percussion caps existed.  It would have to have been constructed as a flintlock rifle, then converted to percussion at a later date.  I’m not an expert, but such things did happen, so I’m assuming the rifle is authentic as represented.   I hope anyone who has information on these items will contact me – it would be nice get the facts straight and save the information for posterity.  

Andrew Ellison's rifle is the lower one in the photograph

Andrew Ellison's rifle is the lower one in the photograph


The label is inscribed "Cap & Ball Musket, Powder Horns, Circa 1840, Originally owned by Andrew Ellison (1811-1894), Son-in-law of Col. Daniel Collier, Presented by Stanley and Louise Rowe

The label is inscribed "Cap & Ball Musket, Powder Horns, Circa 1840, Originally owned by Andrew Ellison (1811-1894), Son-in-law of Col. Daniel Collier, Presented by Stanley and Louise Rowe


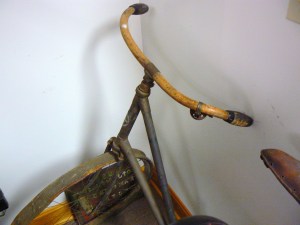
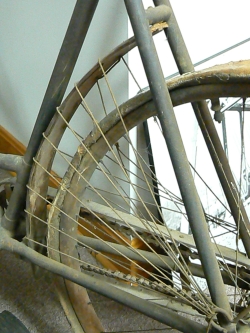
Since I’m also a bit of a fanatic about old bikes, I couldn’t help but notice a “Ben Hur” bicycle, circa 1890, stashed away in the back corner of the museum.  It has pneumatic tires, long since collapsed and hardened, wooden rims, wooden fenders laced onto the frame with cotton cordage, wooden handlebars, and an amazingly intact leather saddle with a relief opening in the center.  The relief opening looks exactly like those on modern “men-specific” saddles of today.  If you like bikes, you should check out this unique example of late 19th century technology.

Headbadge shows the name Ben Hur

Headbadge shows the name Ben Hur


How about those wooden handlebars?

How about those wooden handlebars?


The wooden fenders are laced to the frame with cotton cord, still intact.  Also note the flat tire - pneumatic tires were rare in 1890.

The wooden fenders are laced to the frame with cotton cord, still intact. Also note the flat tire - pneumatic tires were rare in 1890.


Outside the Heritage Center is a public area paved with bricks, some of which are dedicated to people who lived in the area, or have donated on their own behalf.  One of these bricks is inscribed in memory of my grandmother and grandfather on my mother’s side. 

Grandma & Grandpa Ellison's brick

Grandma & Grandpa Ellison's brick

 It ‘s nice to see that so many former residents of Adams County are remembered here.  Adams County Ohio is one of the most impoverished areas in the United States, with a per capita income of around $16,000.  Those of us whose parents were born there would do well to go back once in a while and think about how hard they worked to help us get to where we are today.


An American Roadster, more or less Resurrected!

September 14, 2009
The finished beast in all her 39.5 pound glory!

The finished beast in all her 39.5 pound glory!

After a month and a half of blood, sweat, toil, tears, interruptions, errors, disappointments, misinformation, heartache, and persistence, I am (sort of) finished with the Viking 5 Star American!  This project has been prolonged primarily by my own ignorance, and although I have reached a fairly acceptable result, there remain opportunities to do a better job.  In other words, it’s like every project I undertake – compromises have to be made in order to finish the job. 

Had I been possessed of an unlimited budget, I would have had the handlebars, stem, fenders, crank and chainring re-chromed.  The bike would then have looked approximately as it did when new, although sans decals.

However, I had almost no budget for this job, so those items that couldn’t be de-rusted and shined up were painted, with the hope that some day in the future, I can get around to doing the job more permanently.  I settled for a complete mechanical overhaul, replacement of the brake cables and pads, complete rebuild of the rear wheel, stripping and painting of wheel rims, fenders, and chainguard, repair and refinishing of the original grips, and a teardown, cleaning and polishing of the original saddle.
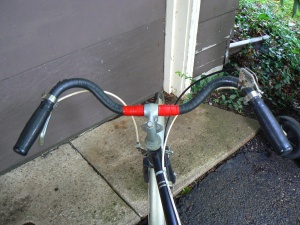
I was able to replace the handlebars with a new Wald 8095 Touring bar, which resembles the original, but is wider (I really needed the extra width).

Wald 8095 handlebars replaced the originals, which were beyond repair

Wald 8095 handlebars replaced the originals, which were beyond repair

All in all, I’m pretty pleased with the results of this one, and today I took her out for a ride around the block.  The 53-year old Sturmey-Archer 3-speed hub and shifter worked perfectly, as did the brakes, so it’s safe to ride, at least. I’m really pleased with overall look of the bike.

Here's the chainguard with the original silkscreen reveal

Here's the chainguard with the original silkscreen reveal

I opted for the English safety white stripe on the rear fender - sort of a nod to Raleigh

I opted for the English safety white on the rear fender - sort of a nod to Raleigh

Everything I replaced is period correct, although the color scheme is a completely imaginary one, and I think the bike will be fun to ride around the neighborhood.    It should keep me in shape, since the gearing is high, and the bike weighs 39 and a half pounds!


Another Bike Project – an American Roadster

September 14, 2009

Note: I wrote this post on July 31 and forgot to post it.  Here it is, followed by today’s post:

I recently came across an unidentified 3-speed roadster style bike at my local thrift store.  I thought it was a 1950 Raleigh Roadster at first glance, then I noticed the very American-style 2-piece crank and the internally mounted kickstand.  It was covered in black paint, except for the fenders and wheels, which were covered in silver paint.  The headbadge said “Viking”.  The saddle was an obvious replacement, but everything else was original, even the handlebar grips, which had a Columbia logo. 

In fact, after querying the bikeforums.com Classic & Vintage board, I was informed that the bike was in fact made by Columbia, in Westfield, MA.  Several guys recognized the crank configuration and the kickstand mount as characteristic of Columbia’s products.  Columbia was the first American bicycle manufacturer, and they became famous for, among other things, some really cool balloon-tired cruisers.  They rated their bikes by a “starred” heirarchy: 3 Star bikes were entry level, 4 Star bikes were mid-grade, and 5 Star bikes were top of the line.

One of the guys suggested I look for the serial number on the frame dropout, and look up the result on the Columbia serial number database online to get the manufacturing date.  The number was in there, and the model year was shown as 1955, with the caveat that some model years ran over into the next calendar year.  This was confirmed when the date code on the 3-speed hub showed January 1956 for its production date.  In short, the bike is nearly as old as I am!

Another collector suggested I try to remove the black paint to reveal any decals that might be underneath.  The normal methods didn’t work too well for the frame, but the chainguard revealed the words: “Columbia built 5 Star American”. 

At this point I decided to try to preserve the bike as much as possible, recognizing that a complete restoration is beyond my capabilities at the moment.   The fenders are chromed, but very rusty, with no way to restore them without a rechrome job.  For the moment, I’m going to prime and paint them, along with the cranks and chainring.  Some day I’ll get the funds and the gumption to have them triple-chrome plated, but for the moment, I want to get the bike ridable and looking presentable.

Here are a few of the pictures taken before and during disassembly, with a few after shots as well:

P1080843

Viking 5 Star American as found - don't look too close!

Here's the headbadge - the only ID we had to start off with

Here's the headbadge - the only ID we had to start off with

Handlebars wrapped with tape to cover the rust!

Handlebars wrapped with tape to cover the rust!

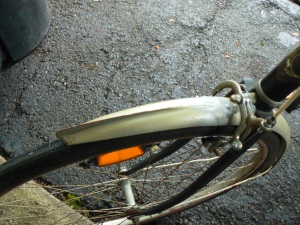
"Beaked" fenders

"Beaked" fenders Gnarly rusty pitted handlebars...Rusty crank, painted over chrome

Removing the top coat of paint revealed this silk screen on the chainguard.

Removing the top coat of paint revealed this silk screen on the chainguard.

I found out a few interesting things about how to clean up old parts in the process of ressurrecting this beast.  Here are a few of them:
1) Rusty chrome can be shined up really nicely by dipping a ball of aluminum foil in lemon juice and polishing off the rust.  It really is effective.  
2) Oxalic acid dissolves rust – a commercial rust remover containing the stuff can be used to soak old fasteners, brackets, etc. and the rust simply goes away!  Be careful not to get it on aluminum parts.
3) Goof Off is a great product for dissolving the top coat of paint – when a bike has been repainted, you can often reveal the original color and sometimes the decals or silk screen decorations.
I’ll be posting pictures of the final results when I get finished!

Back on the Bike (and Breathing Hard Again)

July 19, 2009

After 20 miles of easy biking, I decided it was time to start pushing it a bit. Having fought off a serious case of pneumonia this winter, I’ve been working on controlling my asthma for several months now, and it’s working pretty well. But I’m just now getting back onto the bike for real, and it’s pretty obvious that it’s going to take a while to get back to my previous form.

The day before yesterday, I rode 7.6 miles in 32 minutes at an average speed of 14.0 mph. Yesterday, it was 7.25 miles in 30 minutes, avg. speed 14.5 mph. I’m taking today off, then tomorrow I’ll try to improve slightly on those numbers.

I’m concluding that my speed is pretty close to what it used to be, but my endurance is way down. I guess my first goal will be to get up to an hour at my current speed – but that’ll take a few days (or weeks).

In the process of preparing for this, I had to get my bikes back in shape. I own three French road bikes – two tourers and a club racer. All my bikes are Motobecanes, made by the French company of that name (they’re no longer in the bike business, but they continue to exist as a division of Yamaha that builds mopeds. Motobecane means “motor bicycle” in French)

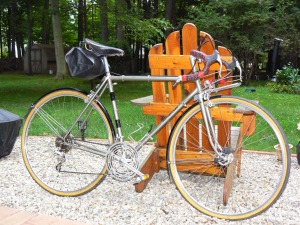
The racer is my fitness bike. It’s a 1982 Motobecane Mirage Sport, a steel-framed 12-speed with racing gearing (meaning hard to pedal most of the time), downtube shifters, and all original components. 27″ x 1″ tires means a fast but rough ride. The plain old low-end 2010 steel frame, however, makes up for a lot in the comfort area. This bike rides sweeter than just about any aluminum-framed carbon-forked over-priced monstrosity you can buy today. It’s the bike I ride around the neighborhood, and it’s equipped for speed. I’ve had it for about five years – my first French bike, and the reason I have two others.
I bought it at a swap meet and had it overhauled at my local bike shop, the cost of which motivated me to learn how to do all my own bike repairs!

The real torture rack - the bike I'm using to get back in shape!

The real torture rack - the bike I'm using to get back in shape!

My 1977 Motobecane Grand Touring bike is definitely the best bike I own. It has a Vitus 172 DB chrome-moly steel main triangle, brazed lugged steel frame, and is completely original in it’s current configuration, right down to the Zefal pump that came mounted to the seat tube. It’s a light day tourer, and it’s great for longer rides that last all day. I got it from a friend at work – it had been hanging in his garage for over ten years. I completely overhauled the bike, but I only had to replace the rubber parts and the bearings, plus a bottom bracket spindle and a few cables. After a lot of leather treatment and mink oil, the Brooks leather saddle is as comfy as a hammock (Sally doesn’t believe it, but it’s true!). This bike was used on a fully-supported tour of Nova Scotia, so the frame is strong enough for heavier loads than I’ll ever carry!

Here's my baby - the lightest frame and the sweetest ride I own!

Here's my baby - the lightest frame and the sweetest ride I own!

The 1982 Motobecane Randonnee is my “heavy” touring bike. Although I’ve never used it for fully loaded touring, it’s capable of handling it. Rack and fender mounts are brazed onto the 2040 steel frame, and the wheels are wider for more load carrying capacity. I use it for trail and path riding. I got it from my neighbor’s trash one night when he wasn’t looking. Sally gave me hell for bringing it into the garage – it was a real rust pile! After stripping the frame, repainting, new decals, a few new components, tires, tubes, cables, new brake levers and hoods, new aluminum bars to replace the rusty chromed steel ones, she looks great! It’s the first bike I’ve built from the frame up – and maybe the last!

Doesn't look like she came from a trashpile now, does she?

Doesn't look like she came from a trashpile now, does she?

I don’t really need three bikes, but I’m not likely to get rid of any of these in the near future – it’ll take quite a nice bike to tempt me to replace one of these three.